Resettining Phone to Set Up Again
Read update
- This guide has been updated to reflect recent changes to Google Photos and Samsung I UI.
For near of us, the majority of our important data (messages, calendars, contacts, then on) lives in the deject. However, your telephone or tablet might still accept some data not being backed up to the cloud, depending on the apps you apply and the sync/fill-in services you accept enabled. For this guide, we'll be going over some of the ways you can back up this data and ensure it makes it to your next telephone or tablet.
Check account sync status
Checking Android's sync condition for your cloud accounts is a expert kickoff step. This makes sure everything that should be backed up is actually beingness backed up. Open the Settings app, tap the Accounts pick, select your main Google business relationship, and verify that all the apps and services under the account take been synced recently. The settings might look slightly dissimilar (or be in different places) depending on your device.
If some of the services haven't been synced recently, tap the Sync At present button on the page. Depending on your version of Android, the Sync Now choice might be under a menu. The reason to bank check this area is simple: sometimes synchronization breaks.
Make sure your photos and videos are backed up
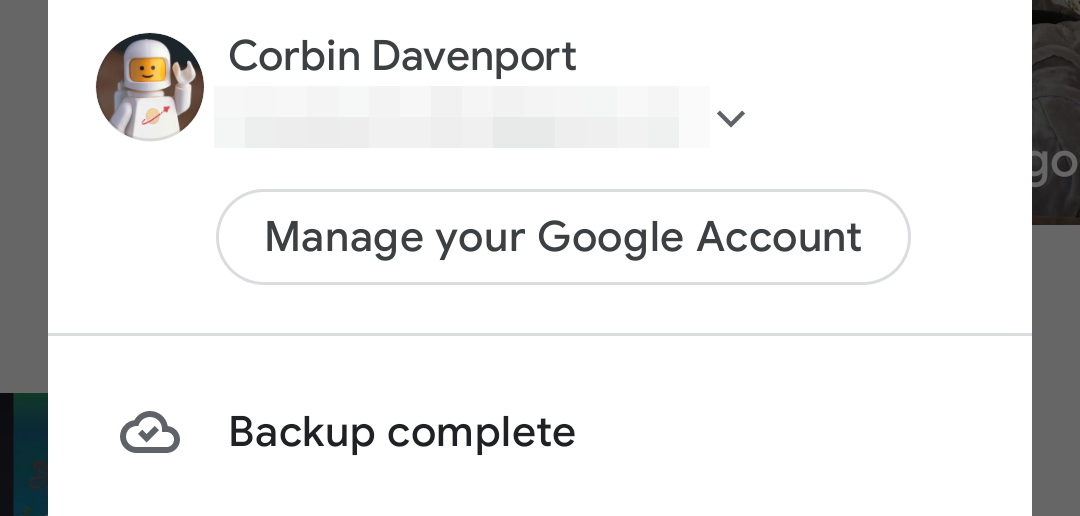
If you use Google Photos to back up the photos and videos you lot take with your telephone or tablet, yous should make sure it'south still doing that. All you have to practice is open the Photos app, tap your profile icon in the top-right corner, and check for the 'Fill-in complete' message. If Photos isn't backing up your media, it will show a 'Backup is off' message instead.
Google is ending unlimited backups in Google Photos, so if you have a lot of media, it might be a good idea to delete unneeded images and videos before enabling backups in Google Photos. For case, Samsung phones and tablets place all screenshots in the Camera directory that Photos monitors for backups, which can quickly eat upwards your account'southward available storage.
Of course, in that location are enough of other photo backup apps for Android, including OneDrive and Dropbox. If you're using 1 of those, go into the app's settings and bank check the current sync status. Yous can besides import photos manually into these apps if yous only desire certain files or folders.
Bankroll up media to a flash drive
If yous have enough storage on your flash drive, and an adapter if one is needed (either Type-C or microUSB), you can just re-create your phone's entire photographic camera binder to the drive. Plug the drive into your phone, and then use the Files app (or the file manager of your choice) on your device to copy the 'DCIM' folder on your telephone to the drive. Whatsoever other folders and types of files, like your Downloads folder, tin be copied just as easily.
Every phone manufacturer has a different file manager, and then if you tin't figure it out, download Files past Google from the Play Store. Once you've opened the app, here's what yous need to do:
- Get the 'Browse' tab.
- Select your internal storage
- Find the 'DCIM' folder in the list and concord down on it until a checkmark appears.
- Tap the bill of fare button at the top-right and select 'Copy to'.
- Select your flash bulldoze in the list.
Once your files are copied, yous tin disconnect the flash drive and back up the photos notwithstanding you see fit.
Bankroll up files to a PC
If you lot have a computer with enough storage, you can also simply connect your phone or tablet over USB and copy the DCIM (and/or other desired folders) in a few clicks. Make sure your phone is in MTP (file transfer) mode from the notification shade, and not set to charge or some other USB connectedness mode.
Backing up files to a Mac
The official method for copying files to and from a Mac is the Android file transfer tool. This app is and then notoriously bad and out of appointment that basically no 1 recommends using it. It often simply straight upward refuses to piece of work, and is a big headache all around. Nosotros have a dedicated article here with another software y'all can effort.
When you create a contact or calendar consequence, your phone might give you lot the option of saving the data in the phone'south internal storage, instead of in the cloud. While that's a nice feature to have, especially for the privacy-conscious, it likewise means yous might accept saved some important data locally if you didn't pay close attention. Earlier you lot wipe our telephone, you lot should check to run across if any of your contacts or agenda events aren't backed up to the cloud. Information technology's also possible to store a limited number of contacts on your phone's SIM card, only this isn't a common practice anymore, and then it's pretty hard to do information technology accidentally.
Some phones, like Google Pixel devices, don't fifty-fifty give you the option of saving contacts and calendars locally.
The verbal process for this varies by phone model, but you lot tin start by opening the Contacts app and looking for a card with all your accounts. For example, the Contacts application on recent Samsung phones displays 'Phone' aslope your Samsung and Google accounts. Some devices have an option to move Phone contacts to an online business relationship, but in some cases, you'll have to export the file (usually accessible through the Share button) and import it using Google Contacts on the web.
Copying a local contact to Google with a Samsung Galaxy phone
Checking for locally-stored calendar events is mostly the same procedure: open your Calendar app and wait for a calendar not linked to whatever accounts. It'southward usually called 'Telephone' or 'My calendar'. However, most mobile agenda apps don't requite you an easy way to export calendars. The best way to do this is to install this utility from the Play Store, open up it, select your phone's calendar, and tap the 'Consign' button. This will give you an .ics calendar file, which y'all can import into Google Calendar, Outlook, or any other cloud service.
Remove online accounts and disable Device Protection
If y'all're selling your phone, or giving it to someone else, you'll demand to log out from all your Google accounts and remove whatever lock screen passwords. Android introduced a characteristic called 'Device Protection' back in 2015, which requires you to enter the password of the last Google account used on the device, later on the device has been wiped in many cases.
While Google does say that Device Protection shouldn't trigger a password check after manufactory reset on most phones, re moving your Google accounts and lockscreen before resetting is the only manner to guarantee information technology won't.
To disable Device Protection, y'all'll start need to log out of all your Google accounts. Open the Settings app on your phone, get to the Accounts section, and tap 'Remove account' under each account.
Removing accounts on a Google Pixel phone
Removing accounts on a Samsung Galaxy phone
Once you've done that, disable any lock screen passwords yous might have. This can be done from the Security section of the Settings app.
UPDATE: 2021/02/20 9:26am PST BY CORBIN DAVENPORT
This guide has been updated to reflect recent changes to Google Photos and Samsung One UI.
Nearly The Author

Source: https://www.androidpolice.com/2021/02/20/how-to-back-up-your-android-phone-before-a-factory-reset/
0 Response to "Resettining Phone to Set Up Again"
Post a Comment